

How To Add Custom Fonts To Google Slides
Using Google Slides comes with its own benefits. One of the benefits is that you get to use the almost modern fonts provided by Google (through Google Fonts) like Montserrat, Lato, and many others directly in your Google Slides presentation.
Past default, you get about 26 different font options within Google Slides. But, what if you want to add more fonts to Google Slides? How do you do that?
To add together fonts to Google Slides, select a text box and click on the "Fonts" selection in the toolbar. Then, from the dropdown, click on "More Fonts". Search for the font using the search bar or coil through the list and cull a font. Click on it to select information technology and click on "OK".
In this commodity, we will understand the process of adding fonts in Google Slides in farther particular! Plus, nosotros shall too take a look at whether we can install custom fonts in Google Slides!
So, without further adieu, let's get started!
1. How to Change Fonts in Google Slides?
In Google Slides, you can hands add together text to your slides. You tin too change the way your text looks by adding text effects to the text in Google Slides.
But, what if yous want to modify the font itself? Well, at that place is a way to do that too!
All you have to practise is follow the ii quick steps mentioned below –
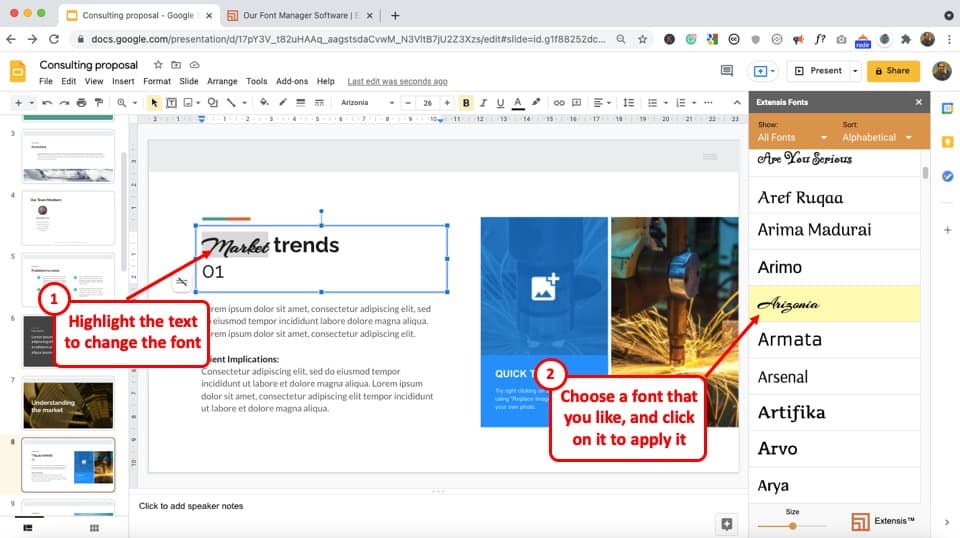
Stride-one: Highlight the text
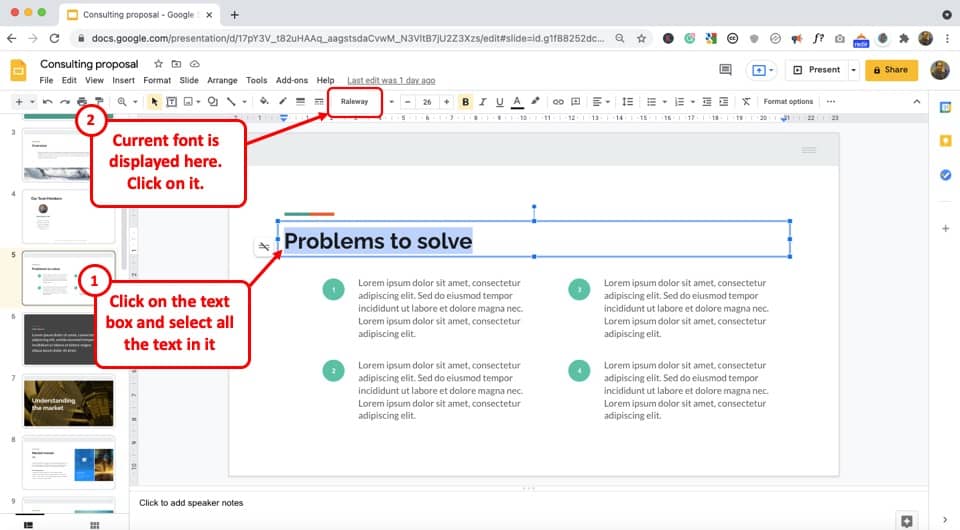
The first step of the process is to click on the text box and select the entire text.
Then click on the "Font" box from the toolbar located at the superlative of the screen right below the carte du jour bar. This will open a dropdown menu containing numerous font style options.
Step-ii: Select your preferred font
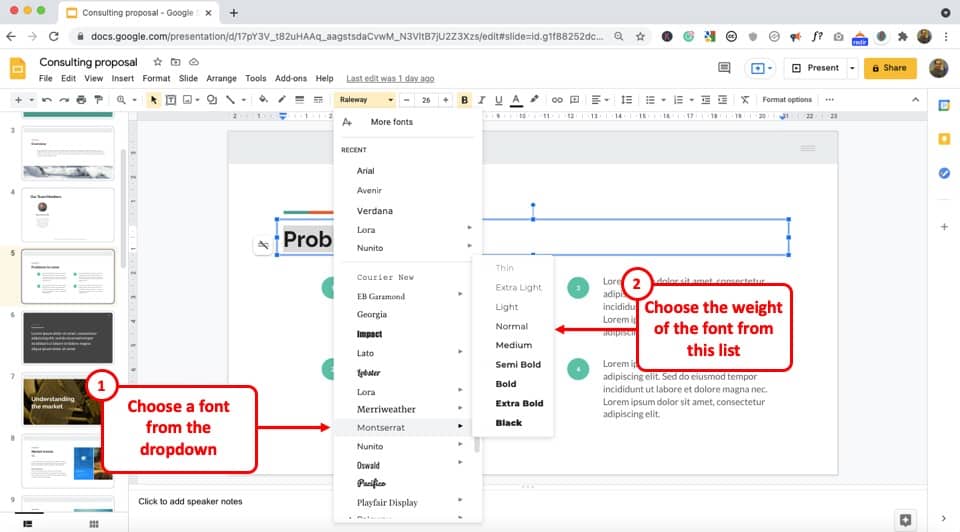
Scroll down the dropdown menu within the "Font" box to detect your preferred font style. Now all y'all take to exercise is click on the new font manner and it will be automatically saved.
2. How to Add More than Fonts to Google Slides?
Google Slides has a variety of font styles to match whatever slide design. The awarding also offers an additional collection of fonts that y'all can utilise in a text box.
You tin can get these fonts either through the "More Fonts" selection or an external source similar the Extensis Fonts through "Add-ons".
2a. Method 1 – Using the "More Fonts'" selection
To add more than fonts to Google Slides with the help of its "More Fonts" option, all you have to exercise is follow the two easy steps below.
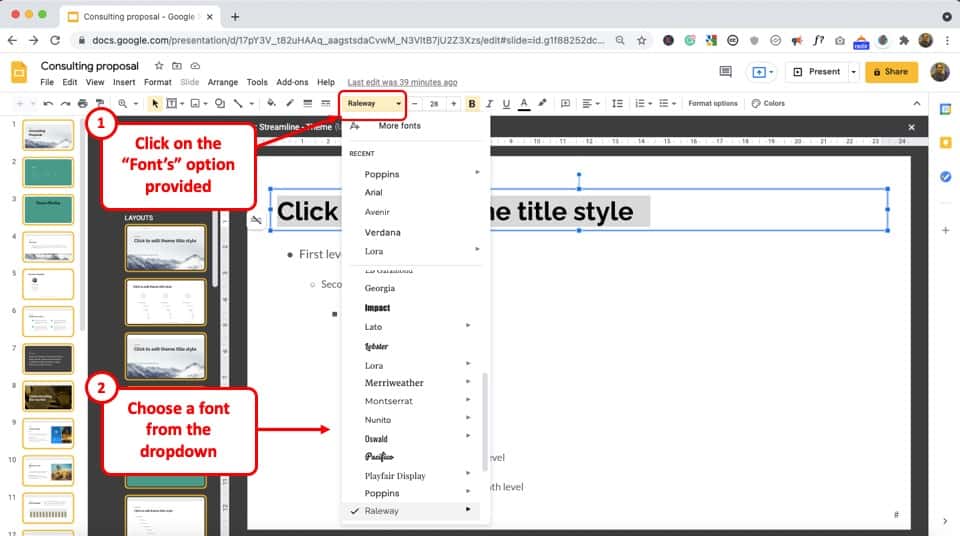
Footstep-1: Click on "More fonts"
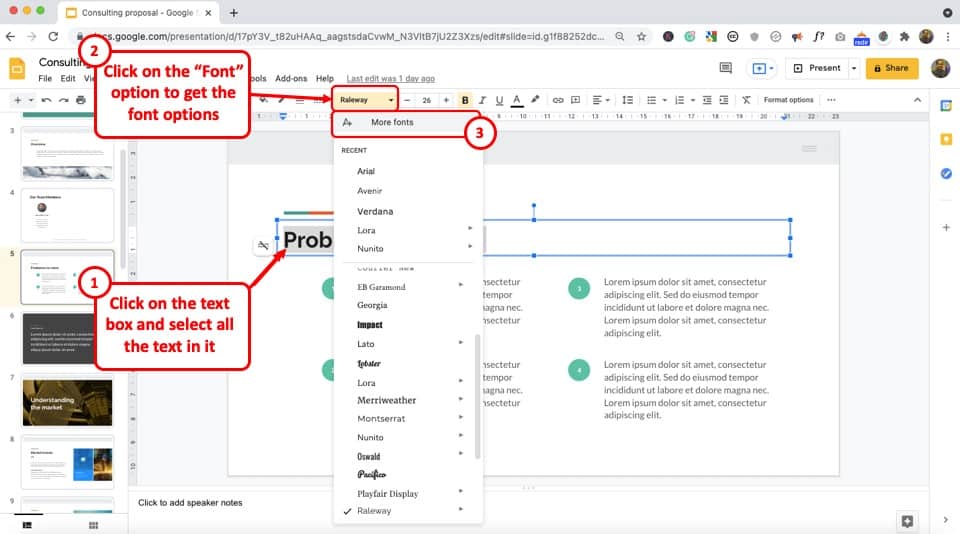
At starting time, you take to select the text in a text box to access the font style editing tools.
Click on the "Font" box in the toolbar to open a dropdown menu and click on the "More fonts" selection. This will open a dialogue box containing additional fonts.
Step-2: Search for a font
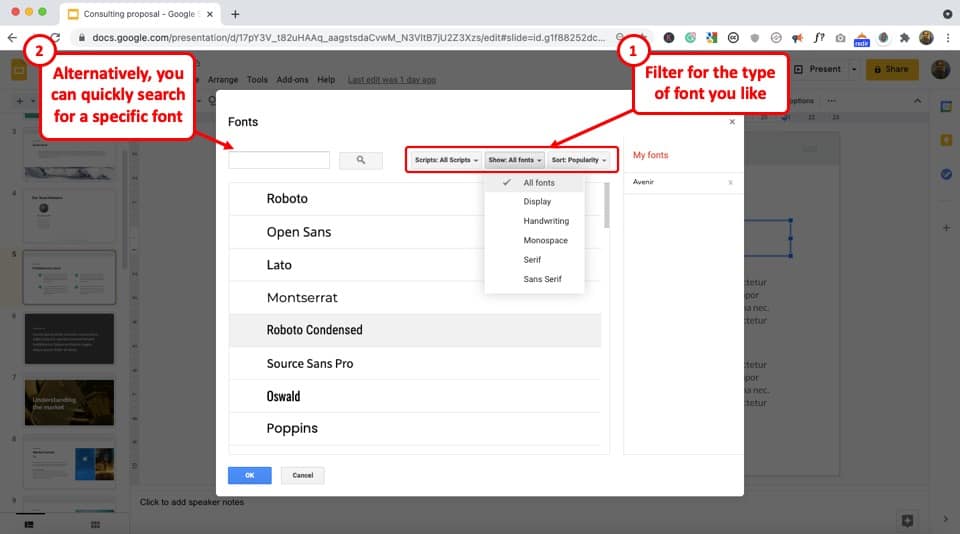
In the "Fonts" dialogue box, scroll through the font styles to find your preferred one.
You can also utilise the "Search box" to observe a specific font. Besides, you lot can click on the "Scripts" button and select a specific linguistic communication for the font styles.
The "Show" button allows y'all to filter only selected styles of font and the "Sort" push helps you to access the most pop or the latest font styles easily.
Step-three: Select your preferred font
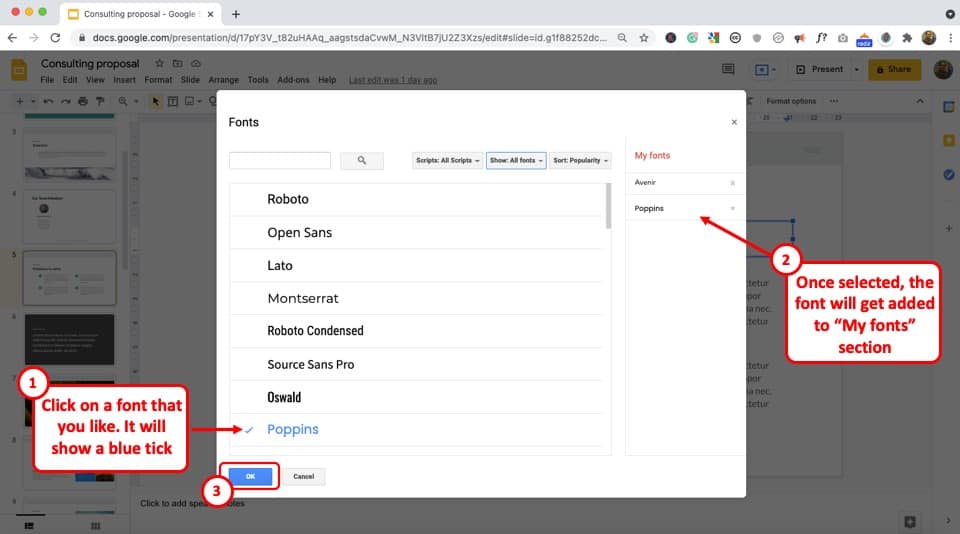
Subsequently clicking on your preferred font, all you accept to do is click on the "OK" button located at the bottom left corner of the "Fonts" dialogue box.
Step-4: Verify that the font has been added
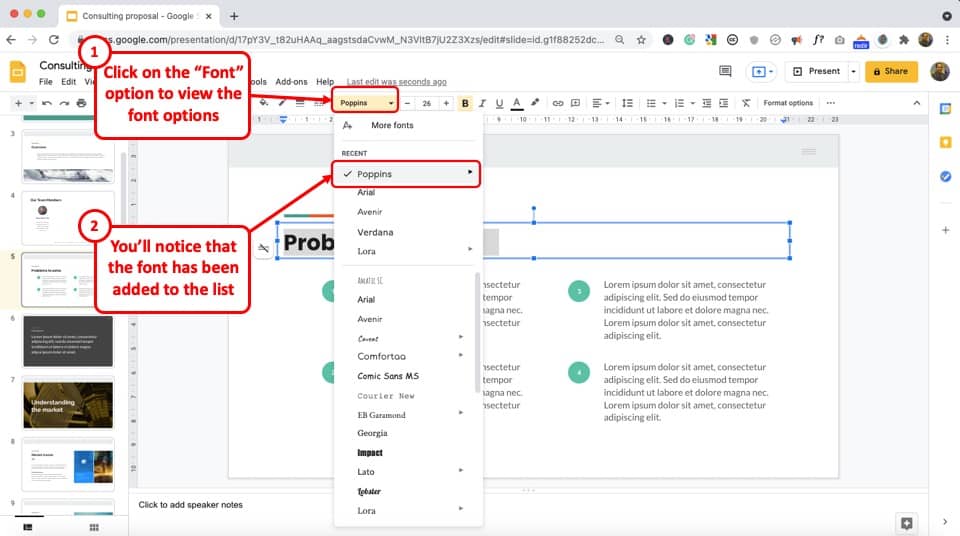
At present, once again select the text and click on the more fonts option. Y'all will notice that the font that you recently added is now visible from the list of fonts available in the dropdown.
Call up! Fonts visible under the "More Fonts" option are Google Fonts. Y'all can also check out Google Fonts for more options and font pairings, and add together a specific Google Font using the search function under the "More Fonts" pick in Google Slides! You get almost 1284 font options in Google Fonts currently!
2b. Method ii – Using Extensis Fonts Add together-on in Google Slides
If y'all are migrating from Microsoft Office, or if you lot simply similar the feeling of having "near-unlimited" font options in your presentation awarding, yous should exist using the "Extensis Fonts" add-on!
The Extensis Fonts add-on provides a ton of unlike options and font styles that you tin cull from! The best part is – but like Google Fonts, it is completely editable and free!
Step-1: Click on "Become add-ons"
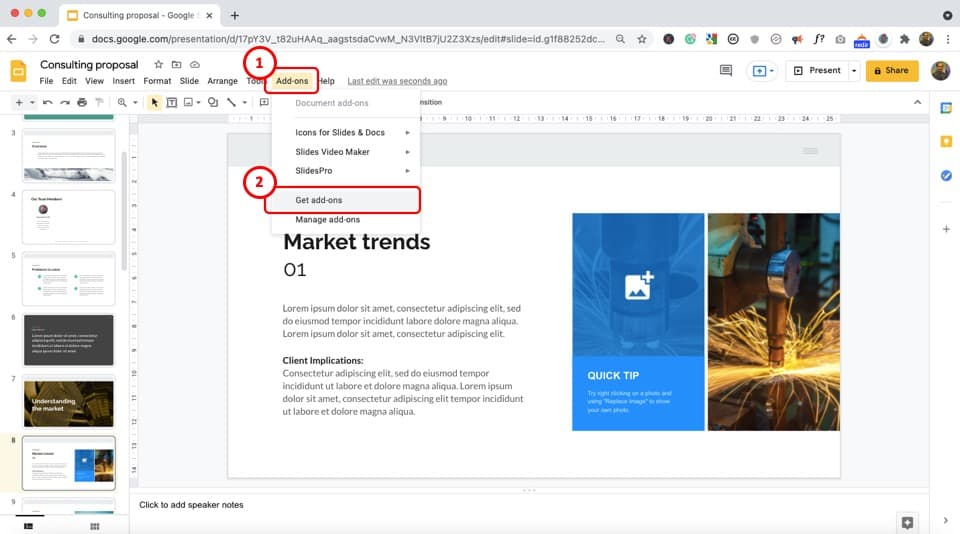
The beginning pace is to click on the "Add-ons" push in the menu bar located at the elevation of the screen. In the "Add-ons" dropdown menu, click on the "Get add together-ons" option. This will prompt a pop-up window.
Step-two: Search for "Extensis Fonts"
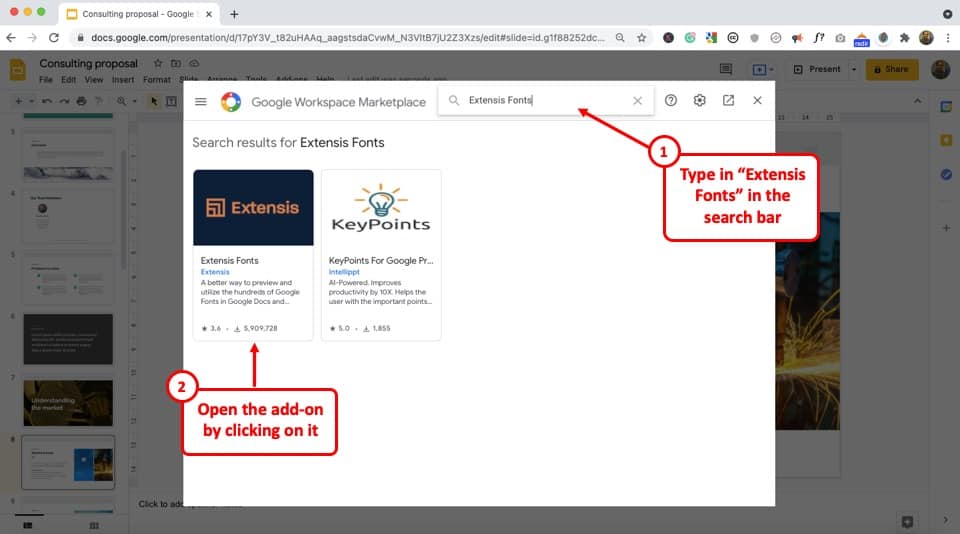
In the "Google Workspace Market" window prompted by the "Get add-ons" option, click on the search bar. Then blazon in "Extensis Fonts" to discover the specific add-on.
Now you have to click on the "Extensis Fonts" add together-on to access it.
Footstep-three: Click on the "Install" button
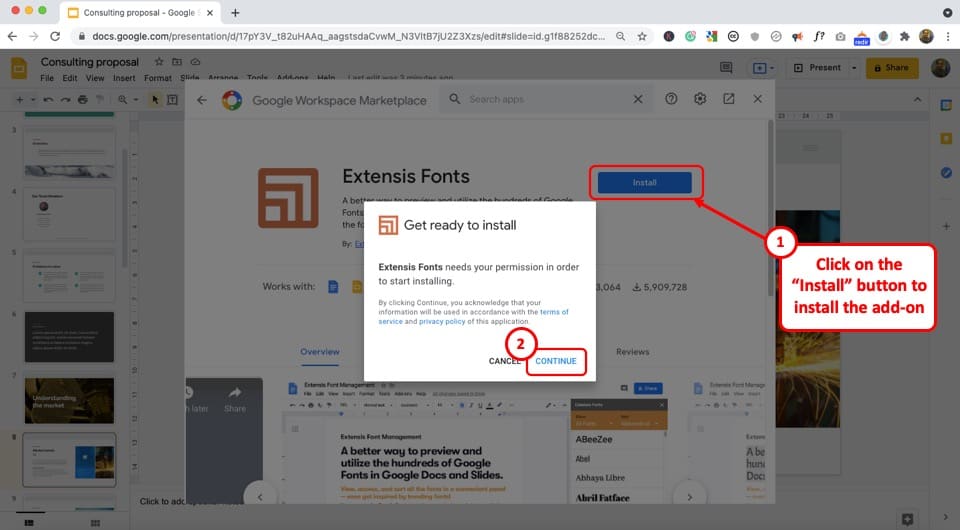
After that, click on the "Install" button on the right side of your screen and and so select the "Keep" option from the prompted dialogue box. This will offset the installation.
Step-four: Sign in to the Extensis Font addition
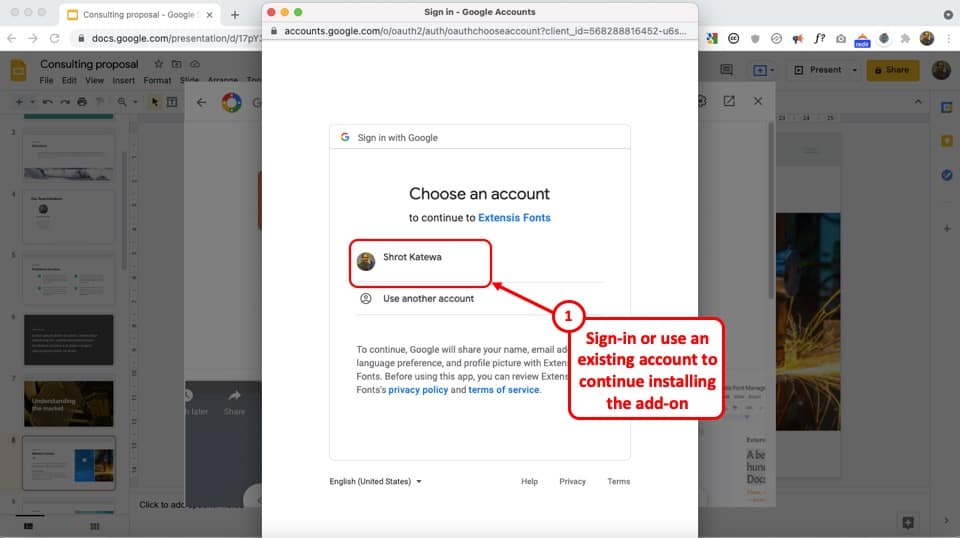
Afterward the Extensis Fonts addition is installed, it will open up a new browser window.
You can use your google account to sign in to the improver. Once y'all have completed signing in, click on the "Allow" button to allow Extensis Fonts access to Google Slides.
Footstep-v: Click on the "Next" button
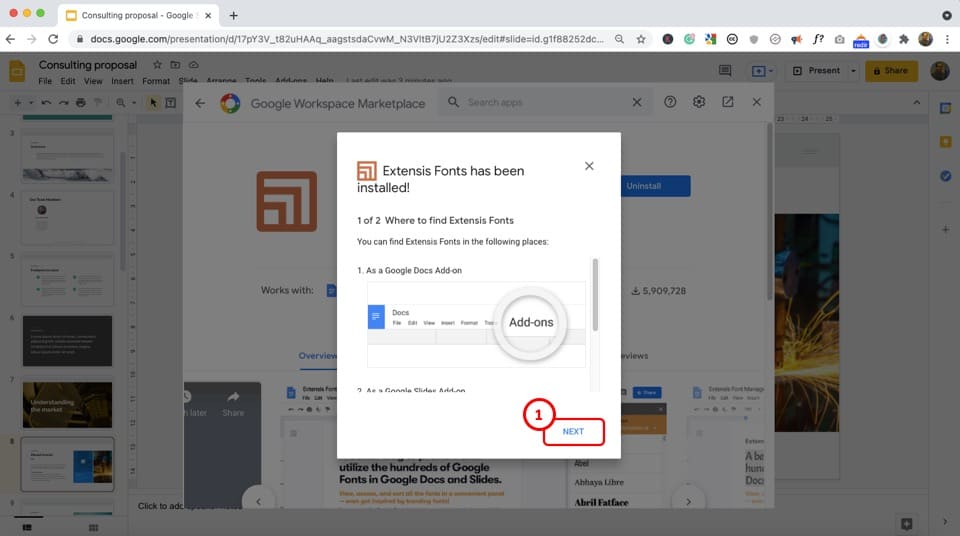
After finalizing the installation process, you will come across another dialogue box prompted past Extensis Fonts. Click on the "Next" pick located at the bottom right corner to continue.
Then click on the "Done" button to return to Google Slides.
Step-half dozen: Click on the "Start" choice
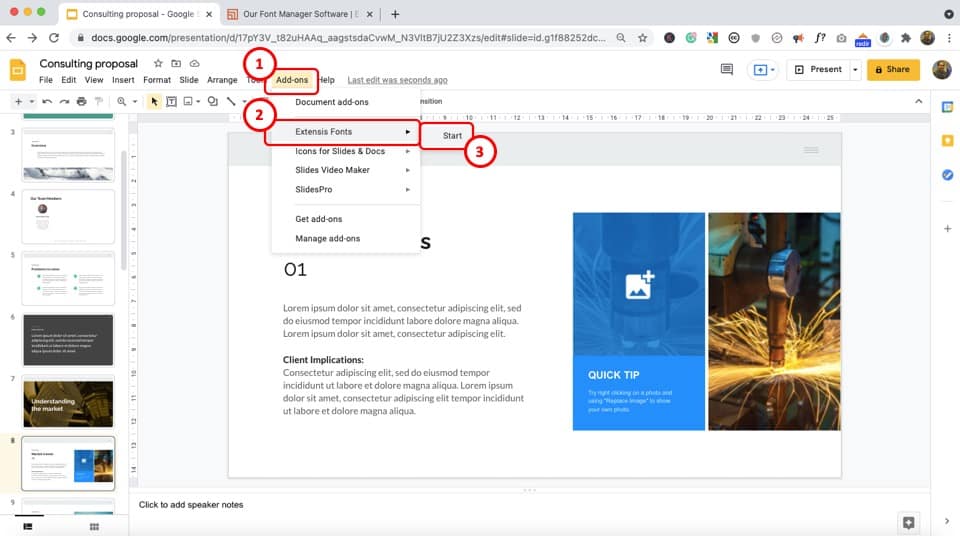
In one case you are washed with the installation process, you can access the Extensis Fonts add-on in Google Slides.
All you have to do is click on the "Add-ons" option in the menu bar. Then hover the cursor over the "Extensis Fonts" choice to admission the "Start" option beside "Extensis Fonts". Click on the "Get-go" option.
This will open an "Extensis Fonts" sidebar with multiple font styles. Yous tin can click on whatsoever of the font styles to select information technology.
Step-7: Choose a font using the "Extensis Fonts" improver
To choose a font, first select the text where y'all desire to change the font.
And so, from the "Extensis Fonts" panel on the right, you can either curlicue downwards and look for a font that y'all like or use the "Bear witness" and "Sort" filter to search for a font apace.
Unfortunately, this add-on doesn't provide a search function so you will have to coil through the fonts manually from the list.
In one case you like a detail font, simply click on it and the font will be practical to the select text! At present, you can change the font size, and utilise other font styles just every bit you would to any default font in Google Slides!
iii. Can Y'all Add Custom Fonts in Google Slides?
A custom font is usually designed or purchased past the user.
Currently, Google Slides does not allow you lot to add, upload, or embed custom fonts in your presentation. However, y'all can cull any Google Font from over one m options provided from the "More Fonts" option in Google Slides.
This is because Google Slides is a web-based application and uploading fonts on a presentation using your account doesn't guarantee the visibility of the text in that font when someone else accesses this presentation.
Although this problem tin can exist fixed easily if Google uses its might, currently at that place seems to be no pick for this.
That said, there is a partial workaround to this problem! You can apply font sites such as Font Squirrel to add a custom font, peculiarly for heading text.
Here'south how to apply custom fonts in Google Slides –
Step-one: Go to a third-party font site
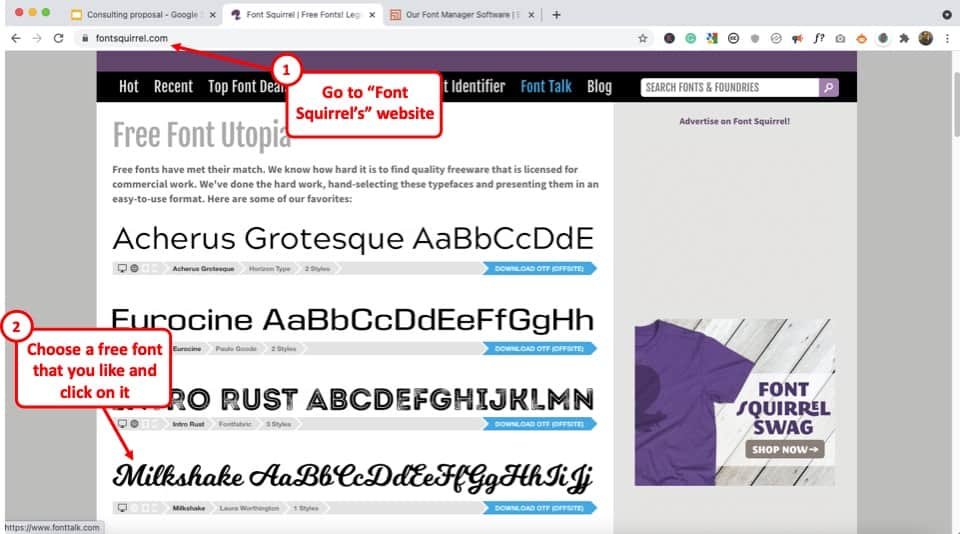
You lot can open a 3rd-party site like Font Squirrel in your web browser. I would recommend using a chrome browser to follow this tutorial although you tin still implement this on other browsers as well. Just that the steps might exist a chip different.
One time you lot are on the font website, but browse through and choose a font that y'all like.
And then, simply click on the font. It will open on a new page.
Pace-2: Open the "Test Drive" choice
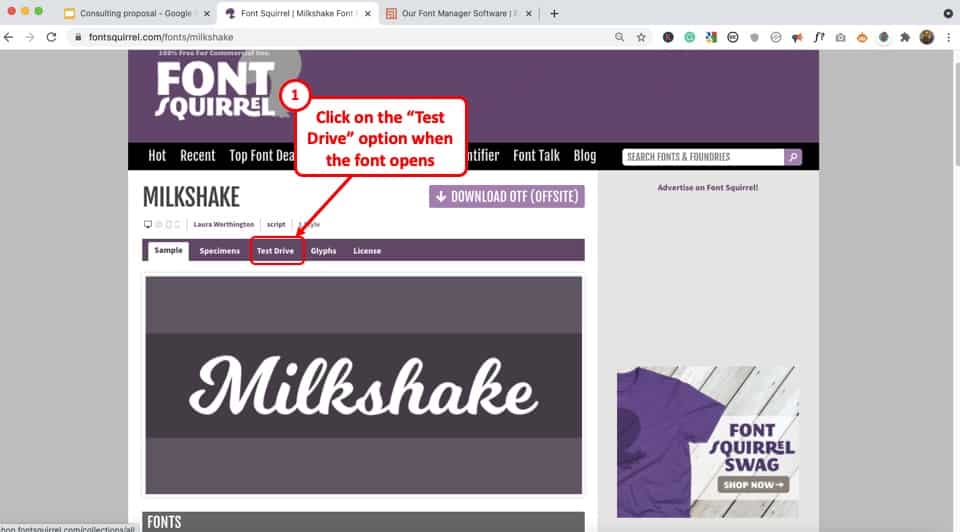
Side by side, when the page for the font that you chose opens upwardly, click on the "Test Drive" tab from the options provided on the top.
Step-3: Add the custom heading
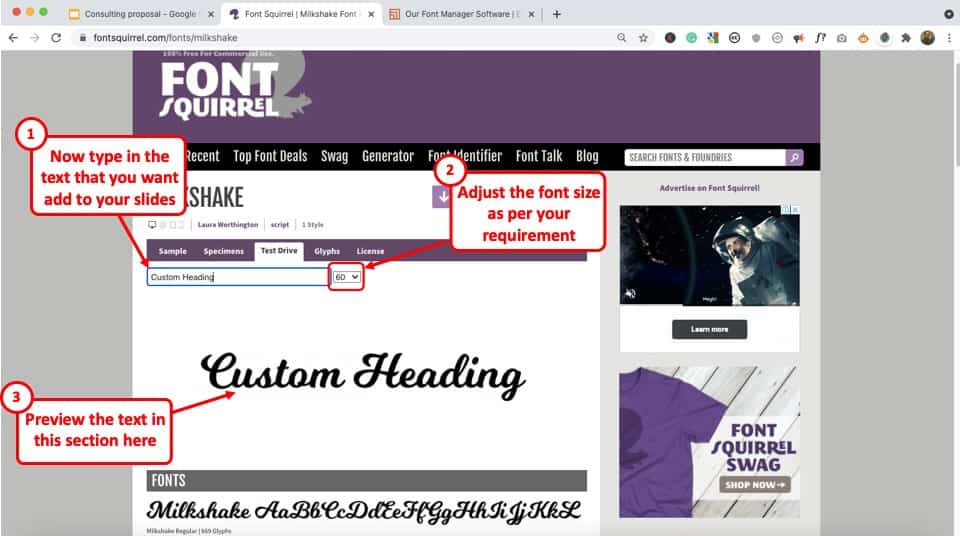
Next, simply type in the custom text or the text that y'all want using a custom font on your Google Slides presentation.
Feel free to conform the font size. As you type the text, you tin run into the preview of the way the text will look using this font. The preview is visible in the section below.
Step-four: Copy the "Preview" paradigm
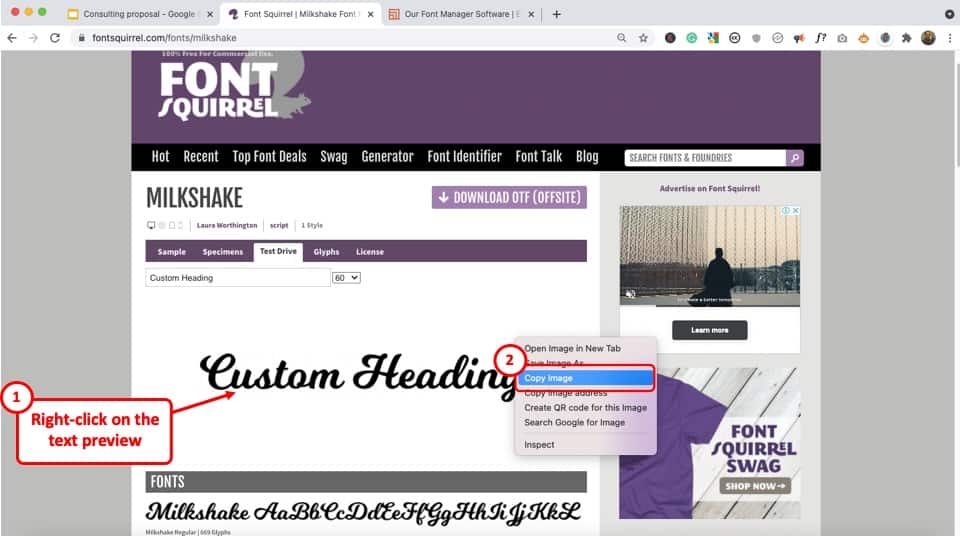
But right-click on the preview that appears on the folio, and select the "Copy Image" selection.
Step-5: Paste the Prototype in Google Slides
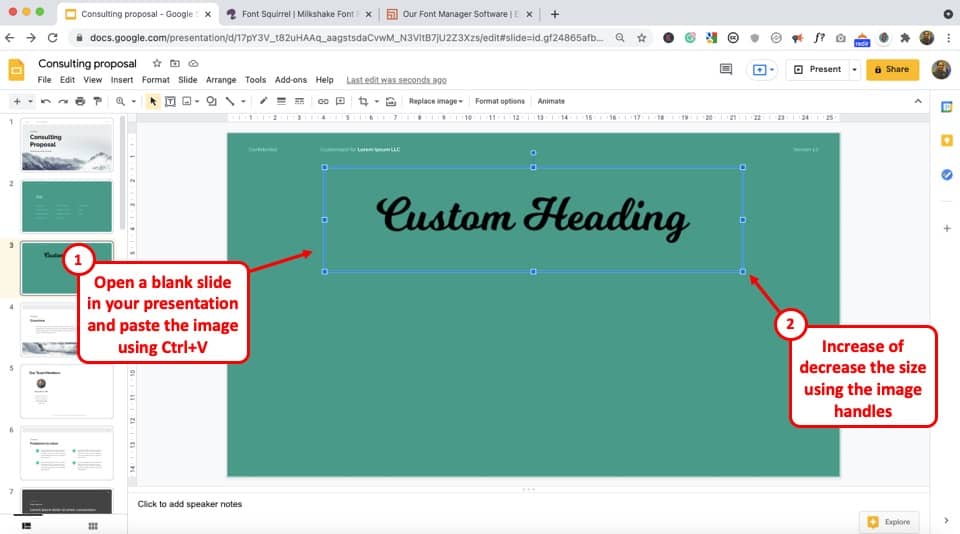
The last pace of the process requires you to paste the preview paradigm that you simply copied on the slide in your presentation.
You can employ the "Ctrl+V" option to paste the image or simply right-click on the slide and select "Paste" from the options.
The only drawback with font squirrel is that you lot don't get too many customization options for the text. For example, you can't go a white font on the slide using font squirrel.
To overcome that consequence you can use other third-party font sites such every bit Font Meme as they provide several different customization options before you copy the text to paste it on your slides!
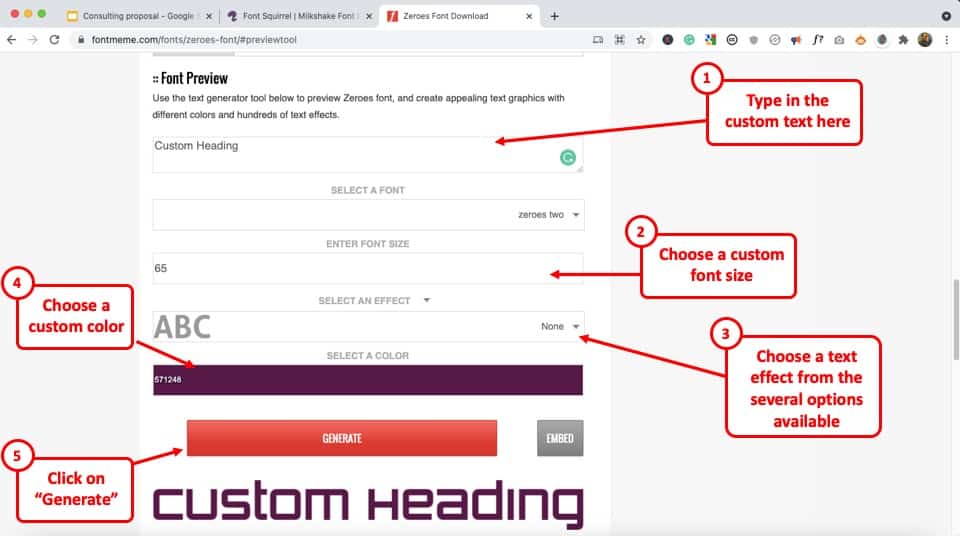
For instance, y'all tin apply custom font furnishings, change color, or the font size even before y'all generate the preview.
Practice keep in mind that not all fonts on font meme are free. So, you will accept to be a bit selective about your options.
Once y'all are done with the customizations, simply right-click on the preview, copy the image, and paste it on your slide as described in the steps to a higher place.
iv. How to Change Fonts on All Slides in Google Slides?
Google Slides allows you to modify the blueprint and theme of the entire presentation at in one case through the "Theme builder" option. You can change the fonts on all the slides in a presentation by post-obit the 4 easy steps.
Footstep-1: Click on the "Theme builder" option
In the card bar located at the top of the screen, click on the "View" button and select the "Theme builder" pick from the dropdown menu. This will open the slide master view.
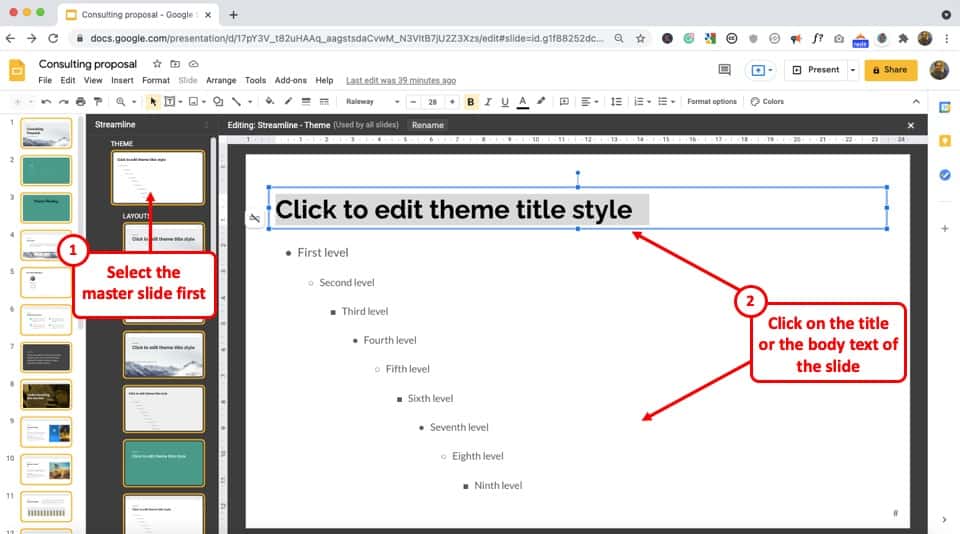
Footstep-two: Open the master slide
In the slide chief view, click on the master slide from the slide layout pane on the left side of the screen. The primary slide is located correct under the "THEME" pick.
Step-3: Click on the "Font" box
Now all you have to do is select the text placeholder in the master slide and click on the "Font" box in the toolbar.
This will prompt a dropdown menu containing diverse fonts. Click on your preferred font to change the font style of the text placeholder.
Step-4: Close the "Theme builder"
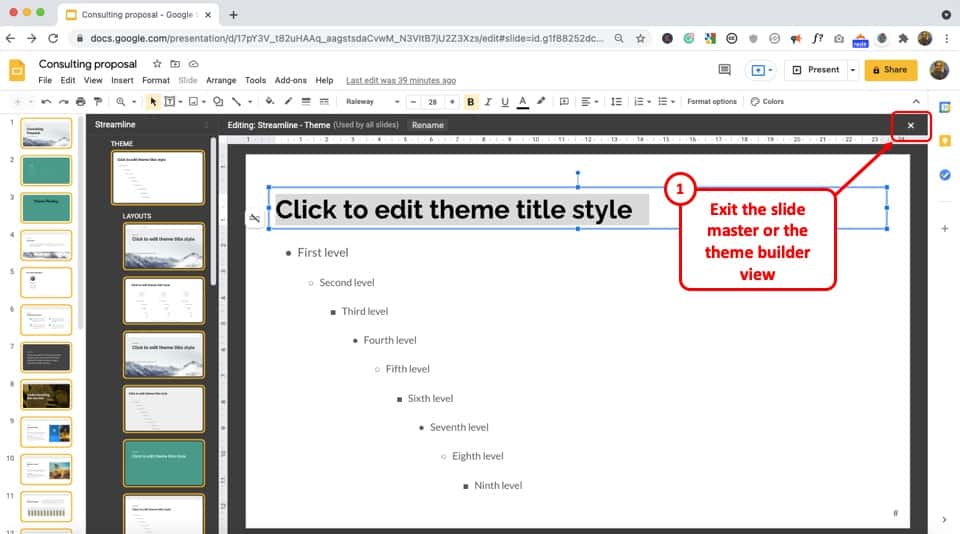
The terminal step is to close the "Theme architect" or the slide master view to salvage the changes to the font. To practise so, click on the "X" push button located at the acme and right corner of the slide master view.
Credit to drobotdean (on Freepik) for the featured image of this commodity (further edited)

How To Add Custom Fonts To Google Slides,
Source: https://artofpresentations.com/add-fonts-to-google-slides/
Posted by: mizerruchoculd1984.blogspot.com
0 Response to "How To Add Custom Fonts To Google Slides"
Post a Comment